Before creating a Camp, you may want to double-check if the Classes feature is a better fit for your program.
Use Camps if you're running one-time or multi-day group sessions, and want to charge customers upfront for all sessions at once.
Use Classes if you're running recurring or drop-in sessions, where customers can book one session at a time.
 Learn more: Should I create a Camp or a Class?
Camps allow you to offer one-time or multi-day group programming, typically intensive sessions where a coach or instructor works with multiple athletes.
To offer private one-on-one sessions, check out the Lessons feature.
To offer ongoing, recurring, drop-in classes, check out the Classes feature.
You can manage all your camps by going to Services > Camps in your Swift Admin Dashboard.
Camps are ideal for group-based programming such as:
One-time or multi-day intensive sessions
Clinics or seasonal programs
Tournament sign-ups or team registrations
To view the existing camps at your facility, just navigate to Services > Camps in your Swift Admin Dashboard. There, you'll see a list of the different camps offered at your facility. If you've never setup a camps before, you should see a card that prompts you to create one.
Please note that by default, you will only see a list of camps that haven't started yet, or are currently ongoing. If a camp has passed and is finished, click the "Completed" tab at the top of the page.
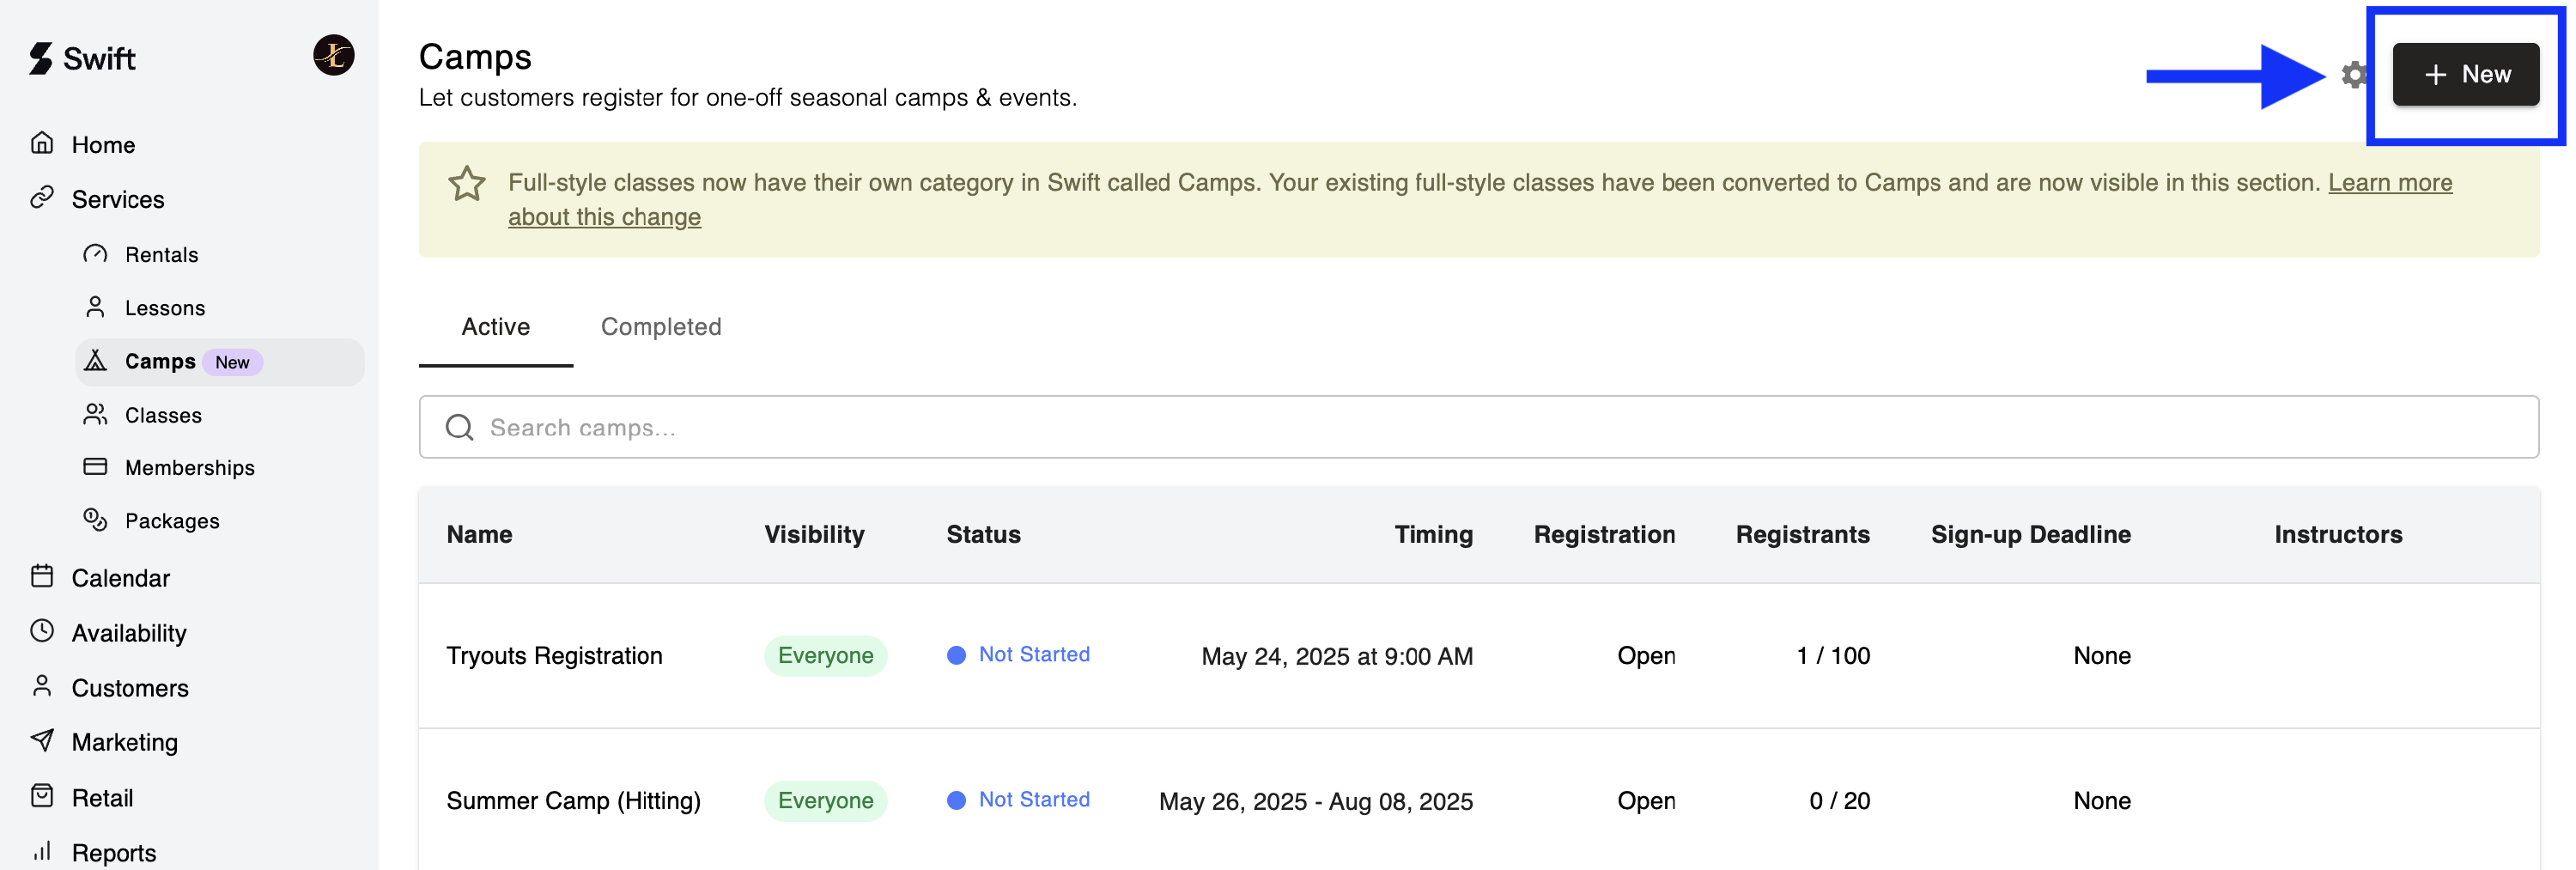
Click the + New button on the top right of the Camps page to open the camp creation form.
Let's go through each of the items on this form step-by-step.
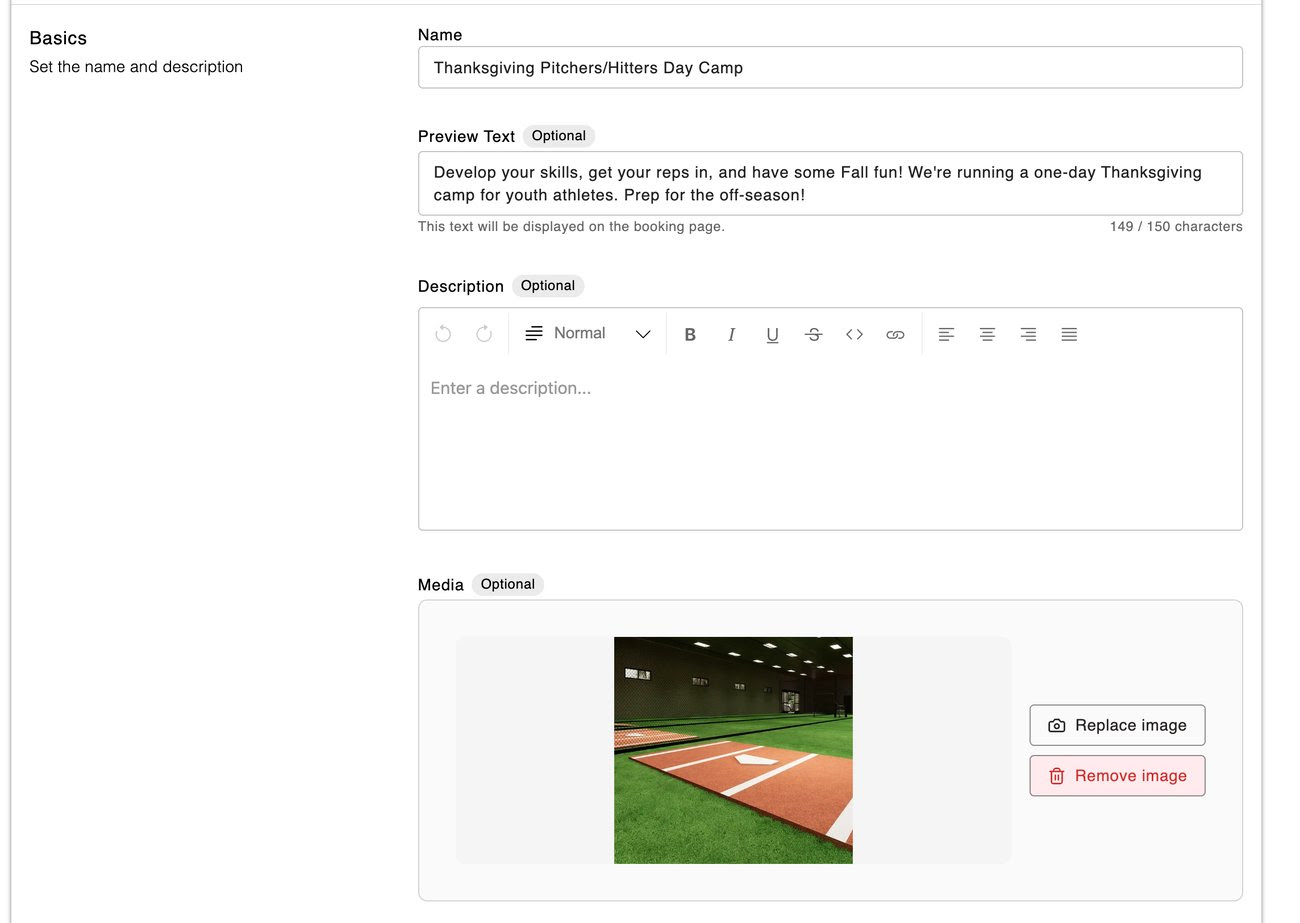
When creating a Camp, you'll want to set a clear name, and optionally, preview text and/or a description. These are customer-facing fields, so make sure they’re clear and helpful.
Preview Text: A short summary that gives customers a quick idea of what the rental is. There's a limit of 150 characters, and the format would be plain text only.
Description: This is where you can be more descriptive, and can add some flair. Use this space to provide any extra details, like what’s included, what to bring, or specific policies.
Media: You can add an image to your service card, giving each service its own unique look and helping customers quickly identify what they’re looking for.
Not ready to add images yet? No problem, any service without one will automatically display your facility’s banner instead.
Please note: This update only applies to the branded booking page at the moment. Support for service images will be coming to branded mobile apps very soon.
Assign instructors now, or leave this blank and add them later.
Once you've decided to assign instructors, you can come back to edit the camp and add the instructors then. An important note is that if you add instructors to a camp through this page after creating the camp, they still need to be added to the specific bookings in the Calendar tab.
In this section, you will setup a few key details about how your camp is run and how customers will be able to sign up for the sessions.
You can set a limit on the maximum number of participants. This limit is inclusive, so if you set it to 10 participants - Swift will allow up to 10 clients to be able to join the sessions before they're considered "full" and unavailable for online booking.
Open: The camp is visible and bookable to customers, and is shown on your facility's booking page.
Closed: Hidden from customers (good for drafts or pre-launch setup).
Once you're ready to accept bookings, just come back to this Camp and change the status to "Open" to open it up to your customers and have it appear on your facility's booking page.
If your camp is ready for bookings, you'll also get the option to set a sign-up deadline. This is an optional step, but it might be useful in driving urgency to get your clients to sign up for camps or clinics before they begin. On the customers' side, they'll be able to see the sign-up deadline on your Camps page before they book.
If you don't want to set a signup deadline, you can just leave this section blank.
In this section, we will create the actual sessions of this camp.
Similar to creating bookings in the Calendar or Availabilities, you can click "Add time" to add a set of sessions to the camp.
Here, you'll be able to specify:
Start Date: When the sessions begin (the specific date)
Start & End Times: The exact timing of the sessions
Repeats: Whether the session repeats, and if so - how often. If you set this to "Yes", you'll see a few options appear:
Frequency: How often the sessions repeat (daily, weekly, or custom)
End Type: How you want the sessions to end (after a specific number of occurrences, or on a specific date)
End Date: The exact date that the sessions stop repeating
Rooms: The spaces or rooms which these sessions will occupy.
Once the above items are specified, the system will double check to make sure there are no conflicting bookings in the times & locations you've specified.
If there's no conflicts, you should see a "Booking time is available" message and you're all set!
Please note that Camps cannot have multiple times added to them. To "re-run" a full camp, please duplicate the camp and create a new one.
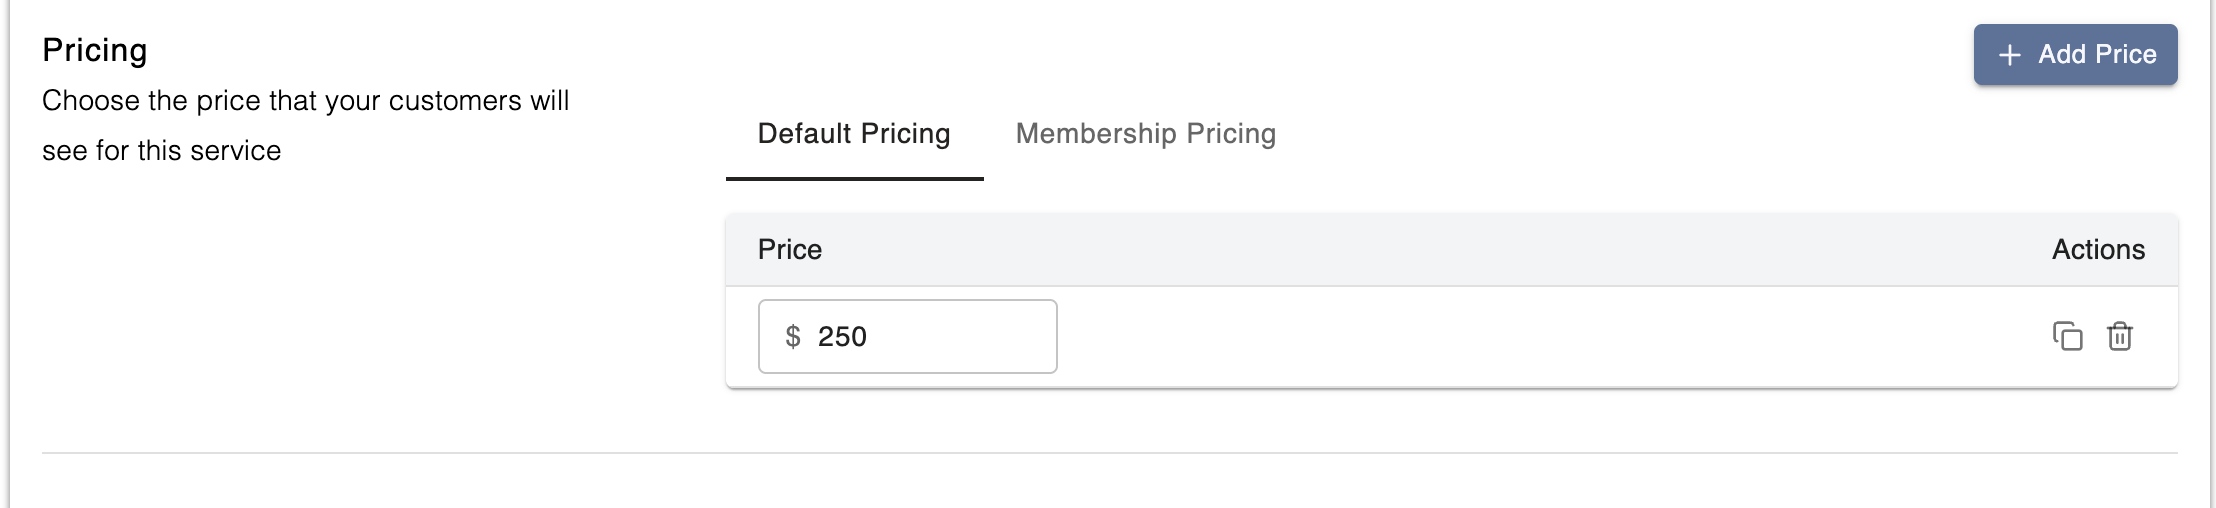
For Camps, registration is a one-time fee, with options for default (public) and member pricing.
Default Price: Summer Camp to cost $250 for non-members,
Select the Default Pricing tab
Click the "+ Add Price" button
Enter $250 in the "Price" field
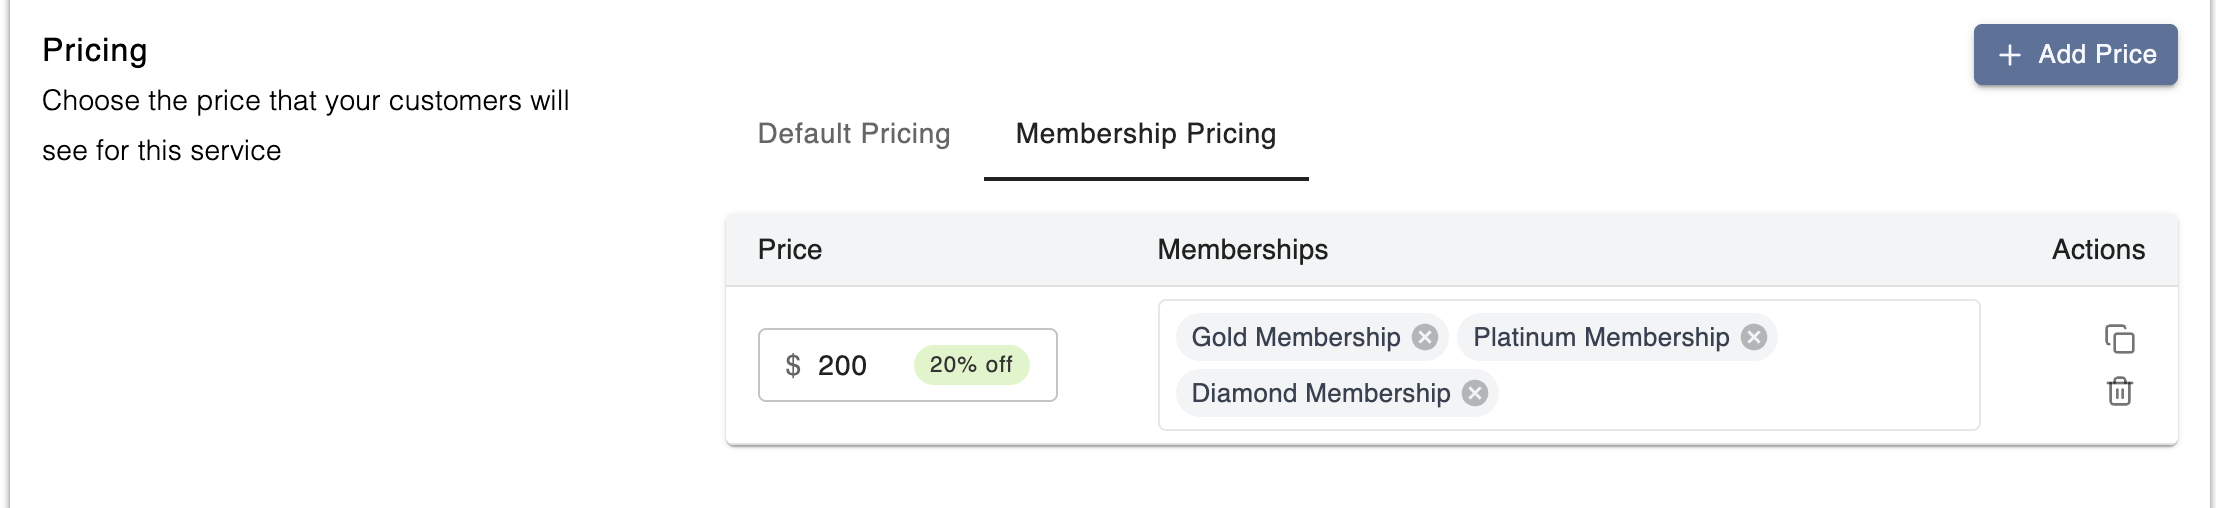
Membership Price: If you want members to pay a discounted price of $200 for the Summer Camp,
Slect the Membership Pricing tab
Click "+ Add Price"
Enter $200
In the Memberships field, select all the membership groups that will receive this discounted price.
If you only set a Default Price and do not set a membership price, then both the public and members pay the same price of $200 for the Summer Camp.
You are now ready to click "Save" and create this camp! If you would like to setup some additional details, you can click the "Advanced Settings" toggle, and a new set of settings should appear below. These are all optional, and not necessary to create your camp.
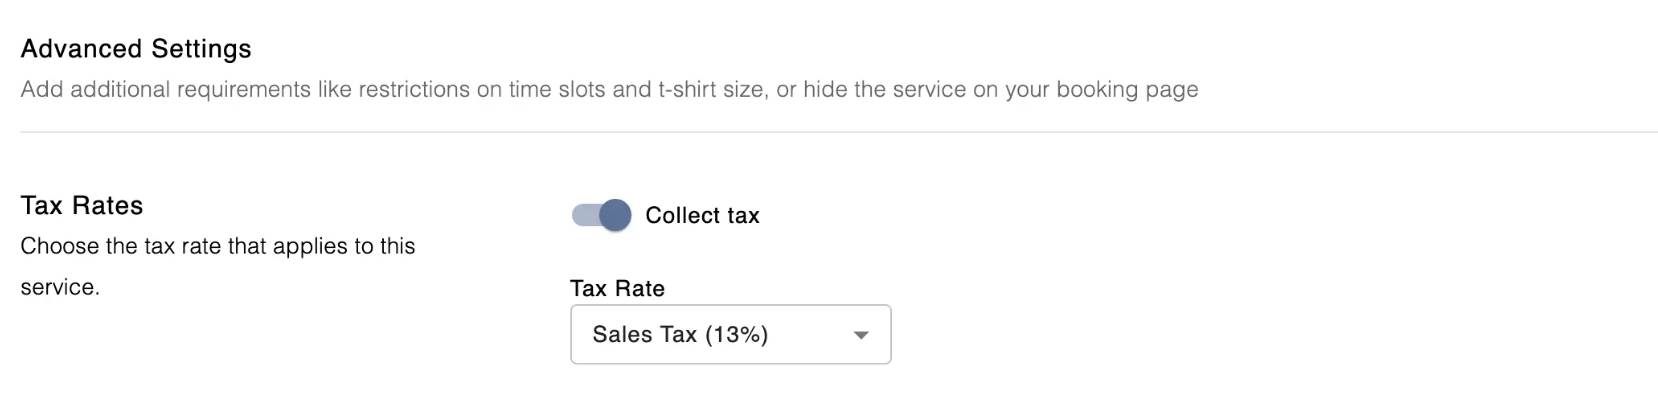
Enable the "Collect tax" toggle to charge customers a pre-defined tax rate when they purchase this camp. This will populate the correct tax amount on your booking page, as well as internally on the admin side of Swift when you charge customers.
If you don't have any tax rates created, visit the Tax Rates settings section to learn how to add them.
Enable the "Collect Custom Fee" toggle to charge customers a pre-defined custom fee when they purchase this camp. This will automatically populate the custom fee amount on top of the booking at checkout, which will be payable by the customer.

If you don't have any custom fee rates created, visit the Custom Fees settings section to learn how to add them.
If you offer camps for specific age groups, you can set restrictions in Swift so that only players of the expected ages can book the camp.
If you setup an age restriction here, customers will be asked to specify their date of birth when booking. They will only be allowed to book if their age is within the limits you've chosen.
To enable age restrictions, just turn the toggle to "On". Then, you'll see the option to specify a "Minimum Age" and a "Maximum Age". It's worth noting that you can leave either end of the range blank if you don't want to set a limit (for example: "Ages 8 and up"). The ranges are also inclusive, so if the end range is 16, then 16-year olds will be allowed to book the camp.
Here, you can choose to ask for "Emergency Contact info" or "T-shirt Size" when clients book the camp online.
By making this camp private, only customers with a direct booking link to this camp will be able to book it. It will be invisible to all other customers, and will not appear on your booking page.
To edit a camp, click into the specific camp from the Services > Camp page and you will be taken to the "Edit Camp" form.
Here, you can edit any of the details mentioned above. Just remember to click "Save" at the bottom to apply your changes!
To make it easier to create multiple camps, you can click into an existing camp on the Services > Camp page, and then click the "bottom arrow" icon on the top right, beside the "Copy direct booking link" button.
You'll now be navigated to a new "Add Camp" form, with all the details of the previous camp filled in! The title will have the word "(Copy)" added to it, to indicate that this is a duplicated camp.
To delete a camp, click into an existing camp and scroll down to the bottom of the page. There, you'll see a "Delete" button on the bottom left.
This button may be disabled if you've already had existing bookings tied to this camp. It may also be disabled if you don't have the permission to delete it (in which case, you should talk to the owner or someone with more access).
If the camp does not have existing bookings, you can click Delete and hit "Confirm" on the modal that appears to remove this camp. Remember, this action cannot be undone.

There are some additional things you can do with camp, which are explained below.
Want to send a direct link to book a camp to a customer? Perhaps you have a private camp or clinic that only specific customers can book? Or you would like to add a button on your website that takes customers directly to this camp?
This button does exactly that! On the top right of a camp form, you should see the "Copy direct booking link" button. Click this, and a direct link to the camp will be copied to your clipboard.
You may also want to control how the "Camp" category as a whole appears on the booking page. You may want to call it "Group Sessions" or "Programs" instead of the generic "Camps" shown on Swift. In that case, you can visit the Services > Camps page in your admin dashboard, and click the "gear" icon on the top right.
You will now see a modal pop up, with a few options. Here, you can customize:
The title of the Camps category - you can call it "Group Training" for example
The description of the Camps category - you can add any additional context here
Once you hit Save, both of these changes will be immediately reflected on your booking page.